|
Our layout has 2 variations.
The basis is 8 square meter in size and is divided into 4 modules,
each 1 x 2 meter.
|
|
|
|
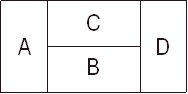
Variation 1
The basis, without his part nothing will go. This is the right hand
part of variation 2.
This page will provide you information about the construction of the basis.
|
Variation 2
This is the extended version which includes the station of Cavaglia
and the keerlus of Brusio. This variation is what we used lately
during exhibitions.
You will find more about this extension on the next pages.
|
|
Modules A en D are standing on legs. The legs have a length of 70 cm and can vary
about 3 cm in length. The middle two modules, B en C, hang in
between the two standing modules.
Each module is divided in
squares of 50 by 50 cm to get a stiff unit and for easy mounting of
the rail carriers. This frame is minimal 20 cm in height. This "open
frame method" makes it easy to reach the layout from below in case
of problems. The total difference in altitude of the tracks is
43 cm, that of the landscape about 1,20 meter, this added to the
20 cm basis gives a total height of 1,40 meter. This all makes it
really a train in a mountain landscape. The primary reason for the
size of the modules of 1 by 2 meter is the number of tracks that
would pass from one module to the other. In module A for instance,
there is a spiral to gain height. This spiral is 5 levels high and
mainly has 2 tracks per level, on 1 level even 3 tracks for a
crossing station. If we would have to split this spiral over 2
modules this would have given us 18 passages and that is asking for
trouble. In modules B and C there are 3 stations (2 visible and one
hidden station) Which also doesn't invite to split-up into smaller
modules. A 2nd argument is the
number of splits in the landscape, you would want to keep those as
limited as possible too. In this way you only have 2 splits that are
directly visible, being the right hand edge of module A and the left
hand edge of module D. The split between modules B and C is, if at all
visible, easy to camouflage with a few trees or bushes.
|
|
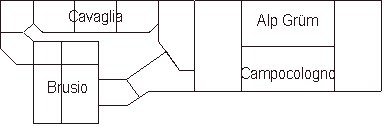
As indicated above, our layout is spread over 4 modules. On the middle module at the front
(module B) we have the station of Campocologno. This fits completely within the 2 meter of the module.
The middle module on the rear (module C) is filled with the majority of the station of Alp Grüm
and below that the shadow-station. Module D contains the rest of the shadow-station and the rest of
the station of Alp Grüm. Also on module D we have a hidden station for trains to pass each other in
the track leading from the shadow-station to Campocologno which is being discussed later with
"The Rail plan".
|
|
 The spiral represented schematically.
|
Module A houses a spiral tunnel that connects various parts of our layout but is also used
to overcome the large difference in height on a small surface. This spiral tunnel has two
parallel rail spirals. The inner spiral brings trains from the shadow-station to the
station of Alp Grüm or visa versa, This makes the largest difference in altitude. The
outer spiral runs from the station of Alp Grüm to the station of Campocologno or visa versa.
Both spirals are single track and used in both directions On the drawing on the left,
you can see how it is put together and also which level exits where. One thing is not
in the drawing; there is another passing station in the outer circle. Also the line
"to shadow-station" splits and the split-off goes underneath to the other side of
the station of Campocologno. The point where the two split is not only the way out of the
shadow-station but also the way in. This makes our layout into an 8 shape, just a little
bit twisted. One circle being the shadow-station and the other the rest of the layout.
|